Introduction
Welcome to this hands-on exploration of the world of LCD TFT displays and environmental monitoring with the ESP32. In this article, we will dive into the universe of TFT displays, exploring their features, libraries and the potential offered, while delving into the implementation of a real-time environmental monitoring system.
Starting from the basics, we will delve into the operation and capabilities of the 2.8″ TFT LCD display, with particular attention to its technical specifications. We will also analyze the key role of the ESP32 in display management and data transfer, exploring its features and potential offered in the Internet of Things (IoT).
Next, we will integrate the DHT22 temperature and humidity sensor into the ESP32 development environment, discussing connection methods and data acquisition techniques. We will use the TFT_eSPI and TFT_eWidget libraries to create an intuitive and customized user interface, allowing you to view real-time environmental data with clarity and precision.
We will also explore the advanced features offered by the libraries, such as creating dynamic widgets and implementing interactive features, which allow you to tailor the system to the specific needs of your project.
As usual, for the development of the project, we will use the excellent IDE PlatformIO.
What is ILI9341 2.8″ SPI LCD TFT Display?
The ILI9341 2.8″ SPI TFT LCD Display is a type of high-resolution color liquid crystal display (LCD) designed to provide a visual interface in electronic projects. It communicates with the microcontroller via a dedicated SPI interface. In addition to color display, it features of a resistive touchscreen that allows direct interaction with the user (via dedicated SPI interface), and of an SD (Secure Digital) card slot that allows you to easily store and access data (via dedicated SPI interface).
Technical features:
Screen size: 2.8 inches (diagonal)
Risoluzione: 320 x 240 pixel
Controller: ILI9341, a popular TFT display controller that supports communication via SPI (Serial Peripheral Interface)
Interface: SPI (Serial Peripheral Interface) for communication with microcontrollers and other devices
Touchscreen: resistive, which allows direct interaction with the user through pressure
SD card slot: for accessing SD memory cards via the SPI interface, allowing data storage and access
Colors: Supports display of 65,536 colors (16-bit)
Viewing angle: good, with clear vision from different angles
Backlight: LED backlight for uniform and adjustable brightness
Compatibility: compatible with a wide range of microcontrollers and development boards
Functionality and use: the ILI9341 2.8″ SPI TFT LCD display with resistive touchscreen and SD card slot can be used in a variety of applications, including:
- Creating interactive user interfaces for embedded devices and IoT projects
- Display of text, graphics and images with the possibility of interaction via touchscreen
- Implementation of data logging systems that use the SD card slot to store and access data
- Making portable media devices, such as video players and image viewers, with the ability to store media files on the SD card
Advantages:
- User interaction: the resistive touchscreen allows direct and intuitive interaction with the user interface.
- External storage: the SD card slot offers the possibility of storing a large amount of data externally to the main device (for example images to be used as wallpaper or icons).
- Versatility: Thanks to its SPI interface and its advanced technical features, it is suitable for a wide range of applications in electronics and embedded computing.
Limitations:
- Programming complexity: It may require some familiarity with embedded programming and graphics libraries to take full advantage of its features.
- Limited screen size: Display size may be limited for some applications that require a larger view.
In summary, the ILI9341 2.8″ SPI TFT LCD Display with resistive touchscreen and SD card slot is a versatile choice for embedded projects that require high-quality color display, user interaction and external storage capacity. With its advanced features and Compatibility with a wide range of microcontrollers, it is ideal for a variety of applications in embedded electronics and computing.
The graphics libraries used: TFT_eSPI and TFT_eWidget
TFT_eSPI library: The TFT_eSPI library is a highly optimized graphics library designed to provide a simple and powerful interface for managing color TFT displays with microcontrollers based on ESP8266 and ESP32 architecture. Here are some of the main features of the TFT_eSPI library:
- Compatibility: supports a wide range of TFT displays with SPI-compatible controllers, including the popular ILI9341 controller used in 2.8″ TFT displays.
- High speed: takes advantage of the hardware capabilities of the ESP8266 and ESP32 microcontrollers to achieve high performance and fast screen refresh times.
- Memory saving: it is designed to take up as little memory space as possible, allowing other microcontroller resources to be used for additional functionality.
- Touchscreen support: integrates resistive touchscreen management functionality, allowing user interaction through touches and pressures on the display.
- Advanced color management: offers a wide range of color management features, including viewing color images, creating graphs, and much more.
- Graphics library: provides a variety of functions and methods for drawing geometric shapes, text and other graphics on the TFT display.
TFT_eWidget library: The TFT_eWidget library is an additional library designed to further simplify the development of interactive user interfaces on TFT displays using the TFT_eSPI library. Here are some of the main features of the TFT_eWidget library:
- Default UI components: provides a wide range of user interface (UI) components, such as buttons, scrollbars, text boxes, and more, that can be easily integrated into your designs.
- Advanced customization: allows full customization of UI components, including changing color, size, and style to fit specific project needs.
- Easy integration: thanks to its intuitive interface and simple programming methods, it allows for quick and hassle-free integration of UI components into existing projects.
- Touchscreen support: automatically manages user interaction via the resistive touchscreen, allowing intuitive use of UI components through taps and presses on the display.
In summary, the TFT_eSPI and TFT_eWidget libraries offer a complete and powerful development experience for creating interactive user interfaces on TFT displays with ESP8266 and ESP32 microcontrollers. With their advanced features and ease of use, they are ideal for a wide range of applications in embedded electronics and IoT.
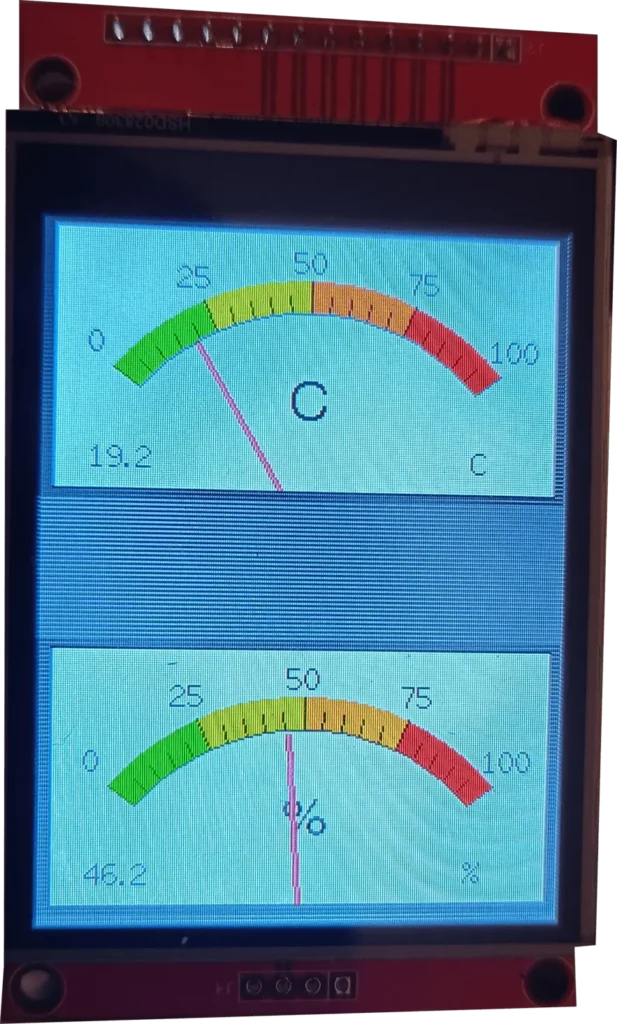
With these libraries we can obtain graphics of this type:

SPI interface
The display, touchscreen and SD card reader each use dedicated SPI interfaces. It is a 4-wire serial communication protocol commonly used in embedded projects. These four wires are:
- MISO (Master In Slave Out): this is the pin through which the module receives data from the master device, which is usually the Arduino or another microcontroller.
- MOSI (Master Out Slave In): this is the pin through which the module sends data to the master device.
- SCK (Serial Clock): this is the clock pin that synchronizes data transmission between the module and the master device.
- CS (Chip Select): this pin is used to select the module and initialize data sending/receiving operations.
What is DHT22
The DHT22 is a digital temperature and humidity sensor designed to precisely measure these environmental parameters. It uses a capacitive humidity sensor and a thermistor to measure the humidity and temperature of the surrounding environment respectively. When powered, the sensor captures data and converts it into digital signals that can be read by a microcontroller or other electronic device.
The DHT22 is characterized by good precision and stability in temperature and humidity measurements. It has a wide operating temperature range and claimed accuracy in measurements. The range of temperatures measured goes from -40°C to +80°C (with a resolution of 0.1°C) while that of relative humidity goes from 0% to 100% (with a resolution of 0.1%). Furthermore, the DHT22 is capable of carrying out a complete measurement in approximately 2 seconds.
The sensor usually has three pins for interfacing: one for power, one for ground and one for digital data transmission. It uses a serial communications protocol to transmit readings to the controller. The data is directly digital so there is no need to acquire it with an analog-to-digital converter.
The DHT22 is widely used in environmental monitoring projects, climate control systems, DIY weather stations and other devices that require precise measurement of temperature and humidity.
Advantages: Among the advantages of the DHT22 are its compact size, ease of use, low power requirement and relative cost-effectiveness compared to other similar sensors.
Limitations: While accurate, the DHT22 may be subject to slight measurement fluctuations in environments with high temperature or humidity variations. Furthermore, its digital interface may require some attention in programming and interpreting the data read.
What components do we need to display temperature and humidity on an LCD TFT?
The list of components is not particularly long:
- a breadboard to connect the NodeMCU ESP32 to other components
- some DuPont wires (male – male, male – female, female – female)
- a 4.7kΩ resistor
- a DHT22 sensor
- a ILI9341 Display LCD TFT SPI 2.8″
- and, of course, a NodeMCU ESP32 !
The ESP32 model chosen for this project is that of the AZ-Delivery company.
Project implementation
The electrical diagram
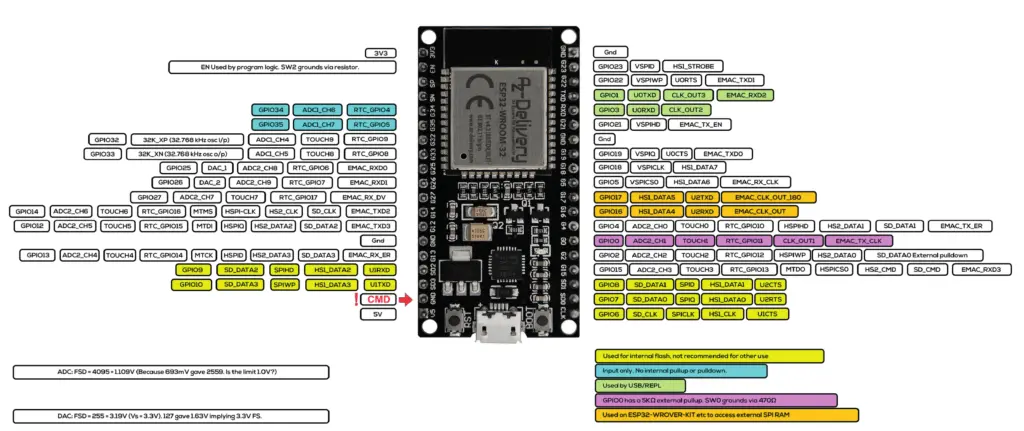
Before creating the actual circuit let’s take a look at the pinout of the board:


The DHT22 sensor pinout:

We will use GPIO 21 to connect the DHT22 to the ESP32.
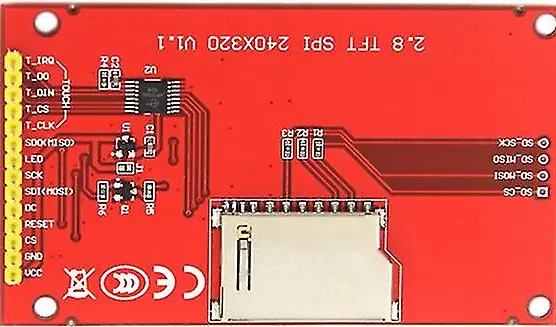
The connections between the display and the ESP32 module will follow the indications in this table:
| DISPLAY | ESP32 |
| MISO | GPIO19 |
| LED | 3.3V |
| SCK | GPIO18 |
| MOSI | GPIO23 |
| D/C | GPIO04 |
| RESET | GPIO22 |
| CS | GPIO05 |
| GND | GND |
| VCC | 5V |
In this project we will not use either the touchscreen or the SD card module incorporated into the display.
In the following image you can see the electrical diagram created with Fritzing:

For those who prefer it, below we see the wiring diagram created using EasyEda:

The sketch
Let’s create the PlatformIO project
We have already seen the procedure for creating a PlatformIO project in the article How to create a project for NodeMCU ESP8266 with PlatformIO.
Although it refers to the ESP8266 board, the procedure is similar.
Simply, when choosing the platform, you will have to choose the AZ-Delivery ESP-32 Dev Kit C V4.
Of the libraries indicated, install only the DHT sensor library for ESPx by Bernd Giesecke as indicated in the tutorial.
Now edit the platformio.ini file to add these two lines:
monitor_speed = 115200
upload_speed = 921600
so that the file looks like this:
[env:az-delivery-devkit-v4]
platform = espressif32
board = az-delivery-devkit-v4
monitor_speed = 115200
upload_speed = 921600
framework = arduino
The remaining libraries (TFT_eSPI and TFT_eWidget) can be installed directly by modifying the platformio.ini file as follows:
[env:az-delivery-devkit-v4]
platform = espressif32
board = az-delivery-devkit-v4
framework = arduino
monitor_speed = 115200
upload_speed  = 921600
lib_deps = bodmer/TFT_eSPI@^2.5.43
           bodmer/TFT_eWidget@^0.0.6
           beegee-tokyo/DHT sensor library for ESPx@^1.19
Finally we also need to replace a file in the TFT_eSPI library after it has been installed. This is the User_Setup.h file that you can download from the link below:
and, once unzipped, put this downloaded file in the project folder PROJECT_NAME/.pio/libdeps/az-delivery-devkit-v4/TFT_eSPI/ (after perhaps renaming the old file as User_Setup.h_OLD just to preserve it).
PLEASE NOTE: the path PROJECT_NAME/.pio/libdeps/az-delivery-devkit-v4/TFT_eSPI/ is the same for both Linux and Windows.
You can download the project from the following link:
unzip it, take the main.cpp file and replace it with the one you have in the previously created project.
Now let’s see how the sketch works.
Initially the necessary libraries are included:
#include <SPI.h>
#include <TFT_eSPI.h>     // Hardware-specific library
#include <TFT_eWidget.h>  // Widget library
#include "DHTesp.h"
Then the tft object that will manage the display is instantiated:
TFT_eSPI tft = TFT_eSPI(); // Invoke custom library
The two indicators for temperature and humidity are instantiated below:
MeterWidget   hum  = MeterWidget(&tft);
MeterWidget   temp = MeterWidget(&tft);
Then the dht object that manages the DHT22 sensor is defined, the GPIO 21 to which it is connected is defined and the measurement time is defined (one measurement every 3 seconds). It is best not to go below this value as the DHT22 can take measurements every 2 seconds.
DHTesp dht;
#define  DHT22_PIN 21

#define LOOP_PERIOD 3000 // Display updates every 3000 ms
We then encounter the mapValue function which maps the indices of the two temperature and humidity indicators onto their graduated scales:
float mapValue(float ip, float ipmin, float ipmax, float tomin, float tomax)
{
  return tomin + (((tomax - tomin) * (ip - ipmin))/ (ipmax - ipmin));
}
We then meet the setup function.
Initially the serial line is activated and the display is set:
  Serial.begin(115200); // For debug
  delay(2000);

  tft.init();
  tft.setRotation(2);
Then, for both indicators, the colored areas on the graduated scales are defined (in green, yellow, orange and red):
// Colour zones are set as a start and end percentage of full scale (0-100)
// If start and end of a colour zone are the same then that colour is not used
//            --Red--  -Org-   -Yell-  -Grn-
hum.setZones(75, 100, 50, 75, 25, 50, 0, 25);
// Meter is 239 pixels wide and 126 pixels high
hum.analogMeter(0, 190, 100.0, "%", "0", "25", "50", "75", "100");

// Colour draw order is red, orange, yellow, green. So red can be full scale with green drawn
// last on top to indicate a "safe" zone.
//             --Red--  -Org-   -Yell-  -Grn-
temp.setZones(75, 100, 50, 75, 25, 50, 0, 25);
temp.analogMeter(0, 0, 100.0, "C", "0", "25", "50", "75", "100"); //
Finally the DHT22 sensor is activated:
dht.setup(DHT22_PIN, DHTesp::DHT22); // Connect DHT sensor to GPIO 21
In the loop function we find the usual if block which carries out the measurement and display operations on the indicators every LOOP_PERIOD ms:
float humidity_f = dht.getHumidity();
float temperature_f = dht.getTemperature();


Serial.println(temperature_f);
Serial.println(humidity_f);


float humidity = mapValue(humidity_f, (float)0.0, (float)100.0, (float)0.0, (float)100.0);
// Serial.print("I = "); Serial.print(humidity);
hum.updateNeedle(humidity_f, 0);


float temperature = mapValue(temperature_f, (float)0.0, (float)50.0, (float)0.0, (float)50.0);
// Serial.print("   T = "); Serial.println(temperature);
temp.updateNeedle(temperature, 0);
Video of the operation
Below we can see our display in action:
Newsletter
If you want to be informed about the release of new articles, subscribe to the newsletter. Before subscribing to the newsletter read the page Privacy Policy (UE)
If you want to unsubscribe from the newsletter, click on the link that you will find in the newsletter email.
🔗 Follow us on our social channels so you don’t miss any updates!
📢 Join our Telegram channel to receive real-time updates.
🐦 Follow us on Twitter to always stay informed about our news.
Thank you for being part of our TechRM community! 🚀