Introduction
In this article, we’re going to build a fairly simple project: a system that controls the brightness of an LED based on the ambient brightness. In practice, the lower the ambient brightness, the more the LED lights up and vice versa. For the detection of ambient light we will use the well-known BH1750 sensor that we met in the article How to make a datalogger with the ESP32 NodeMCU connected to a Django cloud on Raspberry while the LED will be driven via a suitable PWM signal. We have already seen an example of driving an LED with a PWM signal in the article How to control an ESP32 via Bluetooth.
What components do we need for the ESP32 LED control with ambient light sensor project?
The list of components is not particularly long:
- a breadboard to connect the ESP32 NodeMCU to the other components
- some DuPont wires (male – male, male – female, female – female)
- a 100Ω resistor
- a BH1750 sensor
- a red LED
- and, of course, an ESP32 NodeMCU !
Project realization
The wiring diagram
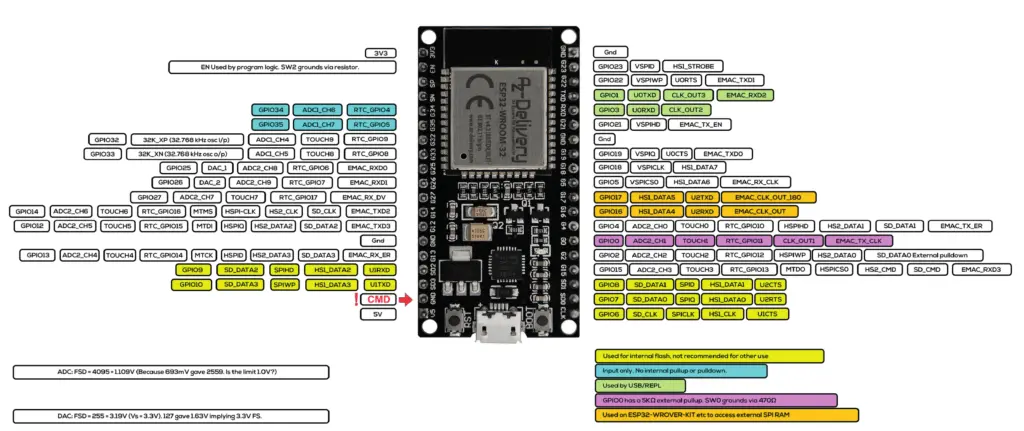
Before realizing the actual circuit let’s look at the pinout of the board:

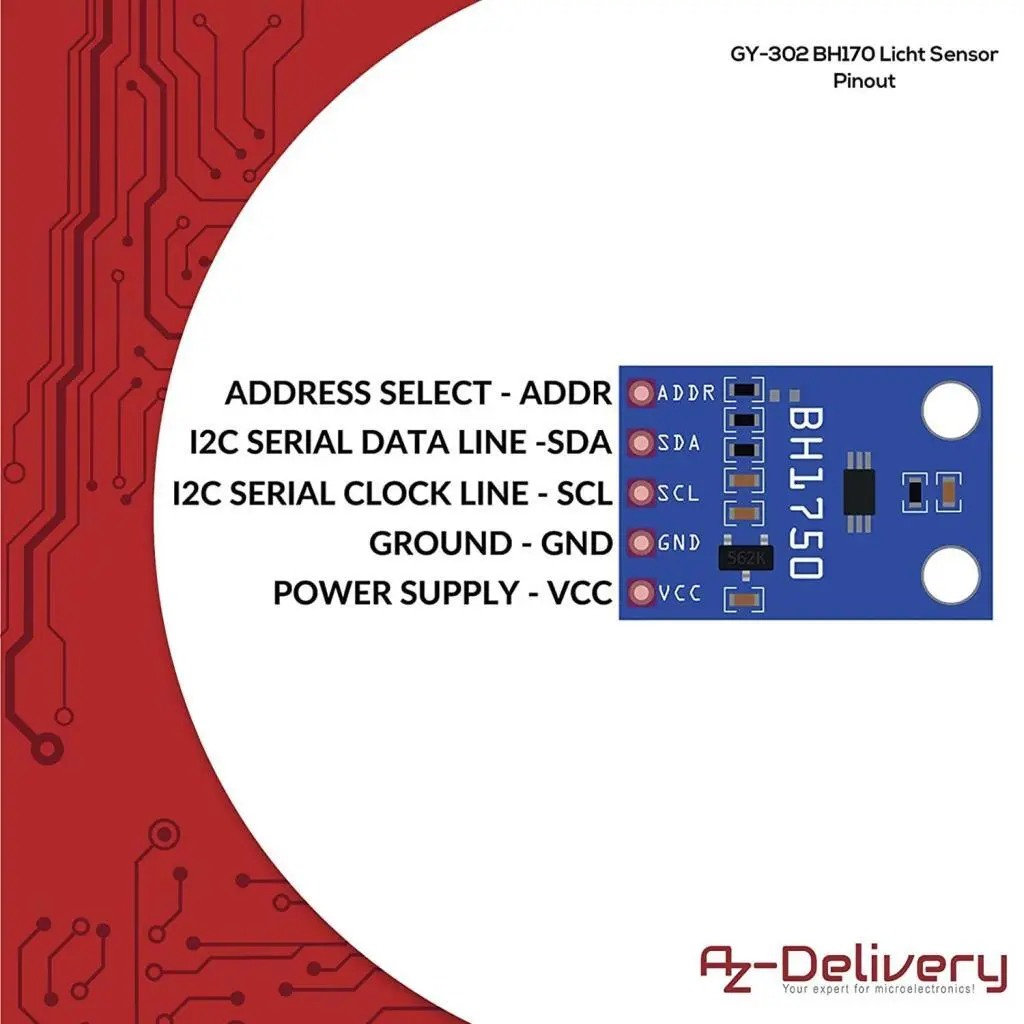
The pinout of the BH1750 is this:

The BH1750 sensor is connected to GPIOs 21 (SDA) and 22 (SCL) of the ESP32. These pins are part of a two-wire communication bus called I2C. This bus requires the presence of a master device (in our case the ESP32) which manages the communication and one or more slave devices (our sensor). The slave devices all have their own hexadecimal address in order to let the master understand which device a certain message is coming from or to make the master send a message to the right slave. In this way, conflicts between messages are avoided, since they travel on the same bus.
The address of the BH1750 sensor can be set via the ADDR pin. In particular, we will have that:
- the address is 0x23 if the voltage at the ADDR pin is less than 0.7 Vdc
- the address is 0x5C if the voltage at the ADDR pin is greater than 0.7V
In general, if there are two or more devices and they have the same address (not modifiable) it will not be possible to connect them to the same I2C bus.
The LED connected to pin 16 is the one whose brightness can be adjusted. To obtain this result, it will be driven by the ESP32 via a PWM signal whose duty cycle varies as the value contained in a specific variable varies, a value that goes from 0 (LED OFF) to 255 (LED completely ON) passing through the intermediate values.
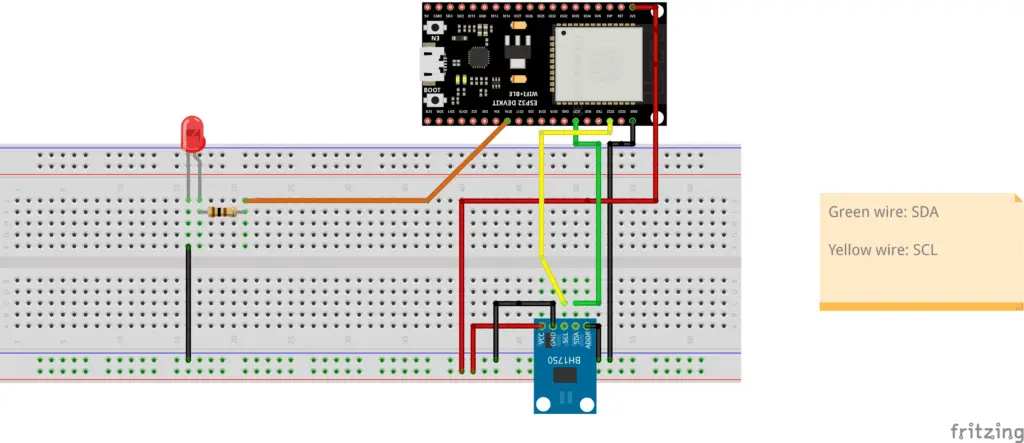
At this point you can proceed with the creation of the circuit by following the connection diagram below. Unfortunately, the ESP32 NodeMCU is too large to fit on the breadboard, which is why it will be connected with flying leads to the rest of the circuit.
The LED is connected to the ESP32 via a 100Ω resistor to limit the current flowing through it and avoid burning it (and burning the digital output).
The LED has two terminals (called anode and cathode) and, like all diodes, it is a component that has its own polarity: it passes the current when it is forward polarized (i.e. the voltage at the anode is greater than that at the cathode) and it blocks current when it is reverse polarized (i.e. the anode voltage is lower than the cathode voltage). The voltage between the anode and cathode, which we will indicate with Vd, varies according to the color of the light emitted. In particular we have that:
- Vd = 1.8 V for red LEDs
- Vd = 1.9 V for yellow LEDs
- Vd = 2 V for green LEDs
- Vd = 2 V for orange LEDs
- Vd = 3 V for blu LEDs
- Vd = 3 V for white LEDs
Below is the assembly diagram created with Fritzing:

As you can see, the sensor power is taken from the 3.3V output of the NodeMCU (pin 3V3). It is necessary to feed it with 3.3V so that its output is also 3.3V as the digital pins of the NodeMCU do not accept voltages higher than 3.3V.
WARNING: in the ESP32 NodeMCU the maximum voltage tolerated by the digital inputs is equal to 3.3V. Any higher voltage would damage it irreparably!!
How do we identify the anode and cathode of the LED? We do this by looking at its terminals. The longest corresponds to the anode. Also, the LED body has a flattening at one point on the edge indicating that the nearby terminal is the cathode.
So if an LED doesn’t light up it’s possible that it’s wired upside down. In this case, to make it work, simply reverse the wiring.
How do you calculate the resistance to connect to the LED?
Please note: this paragraph deals with the calculation of the limiting resistance in a theoretical way and requires a minimum knowledge of the basics of Electrotechnics. Therefore it is not essential for understanding the rest of the project and can be skipped by the reader not interested in such theoretical aspects.
As we have already said, the resistor between the generic GPIO and the LED serves to limit the current flowing through the LED. But how can we calculate its resistance value? Ohm’s Law comes to our aid which says that the potential difference across a resistor (i.e. the voltage measured at the ends of the resistor) is proportional to the current I flowing through it and the constant of proportionality is precisely the resistance value of the resistor R:
V2 - V1 = RIPlease note: for the sake of precision it must be pointed out that while the resistor is the physical component (the actual object), the resistance is its value. So it is improper (even if it happens frequently) to call the resistor with the term resistance.
We can see Ohm’s Law on a simple circuit consisting of a voltage source (the circle on the left) and a resistor:

The voltage (or potential difference) V2 – V1 impressed by the voltage source on the resistor is equal to the product of R by I.
Now let’s see a slightly more complex scheme where the usual voltage generator, the resistor and a red LED are present:

In our case the Vg represents the voltage present at the digital output of the ESP32 when it is HIGH and is therefore equal to 3.3V.
Vd is the voltage across the diode (between anode and cathode) when it is forward biased (ie when it is carrying current). Having chosen a red LED, we know from the previous table that Vd = 1.8V.
We need to determine the R-value of the resistor. We still have one unknown: the value of the current I which must flow in the circuit when the pin is in the HIGH state.
Please note: when the digital pin is in the LOW state its voltage (ie Vg) is zero, it follows that also the current I in the circuit is zero.
LEDs generally cannot withstand currents greater than 20mA, so we impose a maximum current of 15mA to be on the safe side.
By Kirchhoff’s voltage law we have that:
Vg - Vr - Vd = 0From which we derive that:
Vr = Vg - Vd Passing to the real values, we have that:
Vr = 3.3V - 1.8VIt follows that:
Vr = 1.5VBut, by Ohm’s Law, we have that:
Vr = RIfrom which:
R = Vr / ISubstituting the real values:
R = 1.5V / 0.015AThe result is a value of R equal to 100Ω.
The sketch
Let’s create the PlatformIO project
We have already seen the procedure for creating a PlatformIO project in the article How to create a project for NodeMCU ESP8266 with PlatformIO.
Although it refers to the ESP8266 board, the procedure is similar.
Simply, when choosing the platform, you will have to choose the AZ-Delivery ESP-32 Dev Kit C V4.
Do not install the libraries indicated in that article because we don’t need them in this project. But you must, following the procedure indicated in the article, install the BH1750 by claws library:

Now edit the platformio.ini file to add these two lines:
monitor_speed = 115200
upload_speed = 921600
so that the file looks like this:
[env:az-delivery-devkit-v4]
platform = espressif32
board = az-delivery-devkit-v4
monitor_speed = 115200
upload_speed = 921600
framework = arduino
lib_deps = claws/BH1750@^1.3.0
Of course you can download the project from the following link:
Replace the main.cpp file of the project you created with the one present in the zip file.
Now let’s see how the sketch works.
The sketch begins with including the necessary libraries:
#include <Arduino.h>
#include <BH1750.h>
The pin in which to connect the LED controlled with the PWM and the operating parameters of the PWM signal are then defined:
// set the pin for the PWM LED
const int ledPinPWM = 16;  // 16 corresponds to GPIO16

// set the PWM properties
const int freq = 5000;
const int ledChannel = 0;
const int resolution = 8;
Then it continues with the creation of the object relating to the brightness sensor and the definition of the variables for the control of the LED and the detection of the brightness by the sensor:
BH1750 brightnessMeasure;

uint8_t ledPower = 0;
uint8_t brightness;
The variables:
unsigned long measureDelay = 2000;
unsigned long lastTimeRan;
time the readings by the sensor (in this case the reading takes place every 2 seconds).
At this point there is the setup function:
The serial port is activated:
Serial.begin(115200);
  // This delay gives the chance to wait for a Serial Monitor without blocking if none is found

delay(1500);
Then the PWM is configured with its parameters and the PWM channel is connected to the GPIO where the LED is connected.
// configure LED PWM functionalitites
ledcSetup(ledChannel, freq, resolution);

// attach the channel to the GPIO to be controlled
ledcAttachPin(ledPinPWM, ledChannel);
Finally the I2C communication bus and the sensor are initialized:
Wire.begin();

brightnessMeasure.begin();
At the end of the sketch is the loop function.
Right away we come across an if block that contains some functions inside it.
The condition inside the if determines the time frame with which the measurements are made:
if (millis() > lastTimeRan + measureDelay) {
So the described events happen every measureDelay ms thanks to this condition.
Continuing with the if, we see that the ambient brightness is measured and the lastTimeRan variable is updated with the current value in ms:
brightness = brightnessMeasure.readLightLevel();
lastTimeRan = millis();
Immediately afterwards, the value (between 0 and 255) to be given to the PWM to adjust the brightness of the LED is calculated and saved in the ledPower variable:
ledPower = 255 - brightness * 3;
It is possible to modify the conversion coefficient 3 in order to adapt the system to the sensitivity of the sensor.
In this way we will have that:
- ledPower = 0 when ambient brightness is maximum. In this case the LED will be OFF;
- ledPower = 255 when ambient brightness is minimum. In this case the LED will be ON at maximum brightness.
A series of instructions follows which print the various values on the Serial Monitor:
Serial.print(brightness);
Serial.print("  ");
Serial.print(brightness * 3);
Serial.print("  ");
Serial.print(ledPower);
Serial.print("\n");
Finally, the PWM is controlled with the value contained in the ledPower variable in order to adjust the brightness of the LED:
ledcWrite(ledChannel, ledPower);
Demo video
Final remarks
As you can see, this project is very simple both in terms of construction and functioning. It’s certainly useful for seeing how to hook up and operate a light sensor like the BH1750, and for understanding how to drive an LED with a PWM signal. Actually, with appropriate modifications, it can be interfaced to a group of high brightness LEDs by placing a power buffer (like an H bridge) between the PWM output of the ESP32 and the group of LEDs in order to create an effective LED lighting controlled by ambient brightness. In this case it would be advisable to keep the LEDs away from the sensor as they would influence its measurements.
Newsletter
If you want to be informed about the release of new articles, subscribe to the newsletter. Before subscribing to the newsletter read the page Privacy Policy (UE)
If you want to unsubscribe from the newsletter, click on the link that you will find in the newsletter email.
🔗 Follow us on our social channels so you don’t miss any updates!
📢 Join our Telegram channel to receive real-time updates.
🐦 Follow us on Twitter to always stay informed about our news.
Thank you for being part of our TechRM community! 🚀